Search results
A static blog hosted on AWS S3, built with Jekyll and Jenkins
Revision #1 on Feb 10th, 2016: Included instructions for installing Jekyll 3.1.x, since it requires Ruby 2.0 or better. Revision #2 on Mar 20th, 2018: Included instructions for installing Jekyll 3.7.x on OS X High Sierra, since it requires Ruby 2.1 or better.
1. OVERVIEW
Creating a blog was in my TODO list for too long, being too ambitious prevented it me from just getting it up. WordPress or Drupal + phpCAS or Java-based blog/CMS + Jasig CAS for Single Sign On between the blog + Asimio.net; it was too complex and time-consuming.
Earlier this year I read Soft Skills: The software developer’s life manual which I found it to be a really interesting book and that was it, I was decided to start a blog, but took a different route than what was suggested, it had to be simple and fun where I would learn something new in the process and after a day of quick research, I decided it to use Jekyll to generate a static blog and hosted it on Amazon S3 since I’m already using a couple of AWS services with Asimio.net.
In this post I’ll detail how to accomplish this and optionally, use Jenkins to implement a Continuous Deployment approach to automatically deploy the blog when new posts become available. It will also serve me as a short how to guide in case I decide to create a static site again.
2. SETUP AWS S3 BUCKET
In this section an S3 Bucket will be created to host a static website. Once completed it will serve a simple index.html page.
-
Sign up to create an AWS Account or
-
Login to AWS S3 if you already have one.
-
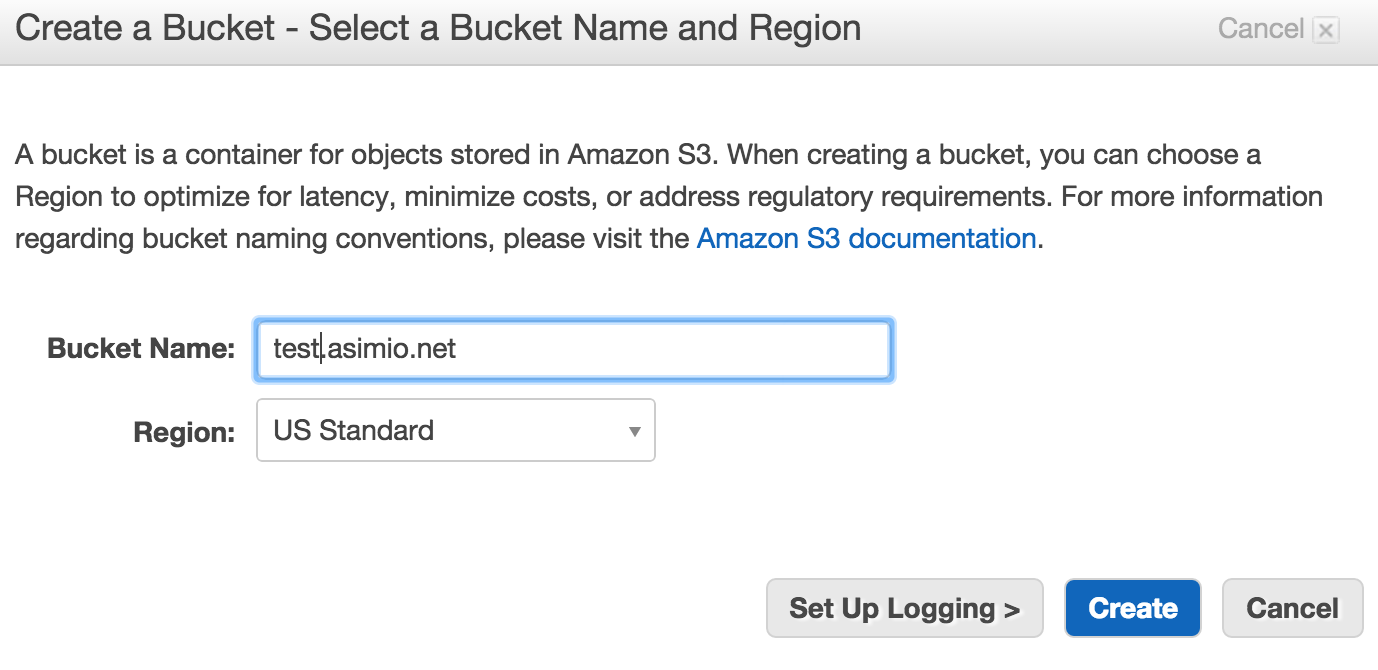
Click on Services -> S3 -> Create Bucket. If you plan to host it using a domain or subdomain, make sure the bucket’s name matches your domain or subdomain name. Keep in mind that bucket names are global to AWS. For the scope of this blog entry, I chose Name and Region to be: test.asimio.net and US Standard respectively.
 Create AWS S3 Bucket - Name and Region
- Click on newly created bucket on the left side -> Properties at the top-right side and expand Static Website Hosting section to edit the values as displayed in the next image:
 Create AWS S3 Bucket - Static Website Hosting
-
Click Save and make sure you take note of the Endpoint value, it will be needed it later. It’s test.asimio.net.s3-website-us-east-1.amazonaws.com for the purpose of this tutorial.
-
Expand Permissions section, found on top of previously edited Static Website Hosting section, click Add bucket policy button and enter the following policy in the Bucket Policy Editor pop-up dialog.
It’ll make Bucket’s content publicly accessible.
{
  "Version": "2008-10-17",
  "Statement": [
    {
      "Sid": "PublicReadForGetBucketObjects",
      "Effect": "Allow",
      "Principal": {
        "AWS": "*"
      },
      "Action": "s3:GetObject",
      "Resource": "arn:aws:s3:::test.asimio.net/*"
    }
  ]
}
Make sure yours is updated to match your bucket name. Click Save to store policy and close the dialog and once more to save Permissions.
- Create a simple index.html page in your PC with this content:
<!DOCTYPE html>
<html>
  <body>
    <p>Hello Blog!</p>
  </body>
</html>-
Upload it to the newly created S3 bucket via All Buckets (top-left side) -> test.asimio.net (or your bucket name) -> Actions -> Upload … -> Start Upload
-
At this point bucket should include a single file named index.html. I mentioned earlier that the Endpoint for the bucket used for this how-to was test.asimio.net.s3-website-us-east-1.amazonaws.com, just enter that in a Browser and it should display: Hello Blog!
Now that an S3 bucket has been setup and it’s successfully serving a static .html file, let’s setup Ruby and Jekyll.
3. AWS S3 STATIC SITE AND DNS
Actually, before setting up Jekyll, let’s fix that weird static site URL.
I mentioned earlier that Asimio.net is using a couple of Amazon services, Route 53 is one of them, but my guess is that this should work with most DNS providers.
Since I’m hosting the blog as a subdomain of asimio.net domain, I just need to add a CNAME record for test.asimio.net:
test 3600 IN CNAME test.asimio.net.s3-website-us-east-1.amazonaws.com4. SETUP JEKYLL
This guide needed to be updated once I upgraded to OS X Sierra and needed to re-install Jekyll 3.1.x, the latest as of Revision #1, but was at version 2.5.x when this post was first published.
This post needed to be updated once I upgraded to OS X High Sierra and needed a clean install of Jekyll 3.7.x, the latest as of Revision #2, requiring Ruby version >= 2.1 while High Sierra ships with Ruby 2.0.
- Ubuntu 14.04
- Jekyll 2.5.x
sudo apt-get install ruby ruby-dev make gcc nodejsPrevious command installs Ruby 1.9.3 which is good for Jekyll 2.5.x but not for Jekyll 3.1.x.
- Ubuntu 14.04
- Jekyll 3.1.x requires Ruby 2.0 or better
sudo apt-get install python-software-properties
sudo apt-add-repository ppa:brightbox/ruby-ng
sudo apt-get update
sudo apt-get install ruby2.2 ruby2.2-dev ruby-switch
sudo ruby-switch --set ruby2.2
sudo gem install pygments.rb --no-rdoc --no-ri
sudo gem install jekyll-paginate --no-rdoc --no-ri
The last commands section includes a couple of gems that are used by this blog but are not required for test.asimio.net example site being set up.
-
Mac OS X Sierra should have Ruby 2.0 already bundled
-
Mac OS X High Sierra ships with Ruby 2.0 but Jekyll 3.7.x requires Ruby version >= 2.1.
First install brew package manager:
ruby -e "$(curl -fsSL https://raw.githubusercontent.com/Homebrew/install/master/install)"Then install Ruby 2.5.0:
brew install rbenv ruby-build
rbenv install 2.5.0
rbenv global 2.5.0
rbenv rehash
ruby -v
ruby 2.5.0p0 (2017-12-25 revision 61468) [x86_64-darwin16]If it still shows ruby 2.0.x ... [universal.x86_64-darwin16], you could also try addind these commands to your .bash_profile:
export PATH="$HOME/.rbenv/bin:$PATH"
eval "$(rbenv init -)"- Ubuntu 14.04 and Mac OS X
sudo gem install jekyll --no-rdoc --no-ri
sudo gem install jekyll-sitemap --no-rdoc --no-ri
sudo gem install sass --no-rdoc --no-ri
Depending on when the preceding commands section is run, it might install Jekyll 2.5.x, 3.1.x or 3.7.x.
Technically, jekyll would be the only gem needed, but tech.asimio.net uses Freshman21 Jekyll theme and it requires jekyll-sitemap and sass gems as well.
I would suggest to start a new project downloading an existing Jekyll theme, but for the purpose of this post,
creating a simple one from scratch is fine.
- Create a new test site
jekyll new my-new-site
cd my-new-site/
jekyll serve --watch --drafts- Open it at localhost:4000
5. PUBLISHING JEKYLL-GENERATED STATIC SITE TO AWS S3
In this section I’ll setup an AWS IAM User for publishing/deployment to AWS S3 purposes, install a useful gem, s3_website, along with its dependencies and configure it with AWS credentials.
- Ubuntu 14.04 - Install Java
sudo echo oracle-java7-installer shared/accepted-oracle-license-v1-1 select true | debconf-set-selections
sudo add-apt-repository -y ppa:webupd8team/java
sudo apt-get update
sudo apt-get install -y oracle-java7-installer- Ubuntu 14.04 and Mac OS X - Install s3_website plugin
sudo gem install s3_website-
Create AWS IAM Group
-
Login to AWS IAM if you haven’t logged in yet.
-
Click on Groups on the left-side menu
-
Click Create New Group
-
Enter Group Name, which I’ll name test.asimio.net-s3-deployer-group where test.asimio.net is the name of the S3 bucket where the site will be deployed to.
-
Leave Policy Type empty and click Next then Create Group
-
Click on the newly created Group, expand Inline Policies section to create a new policy and click Select
 Create AWS IAM Group - Custom Policy
 -
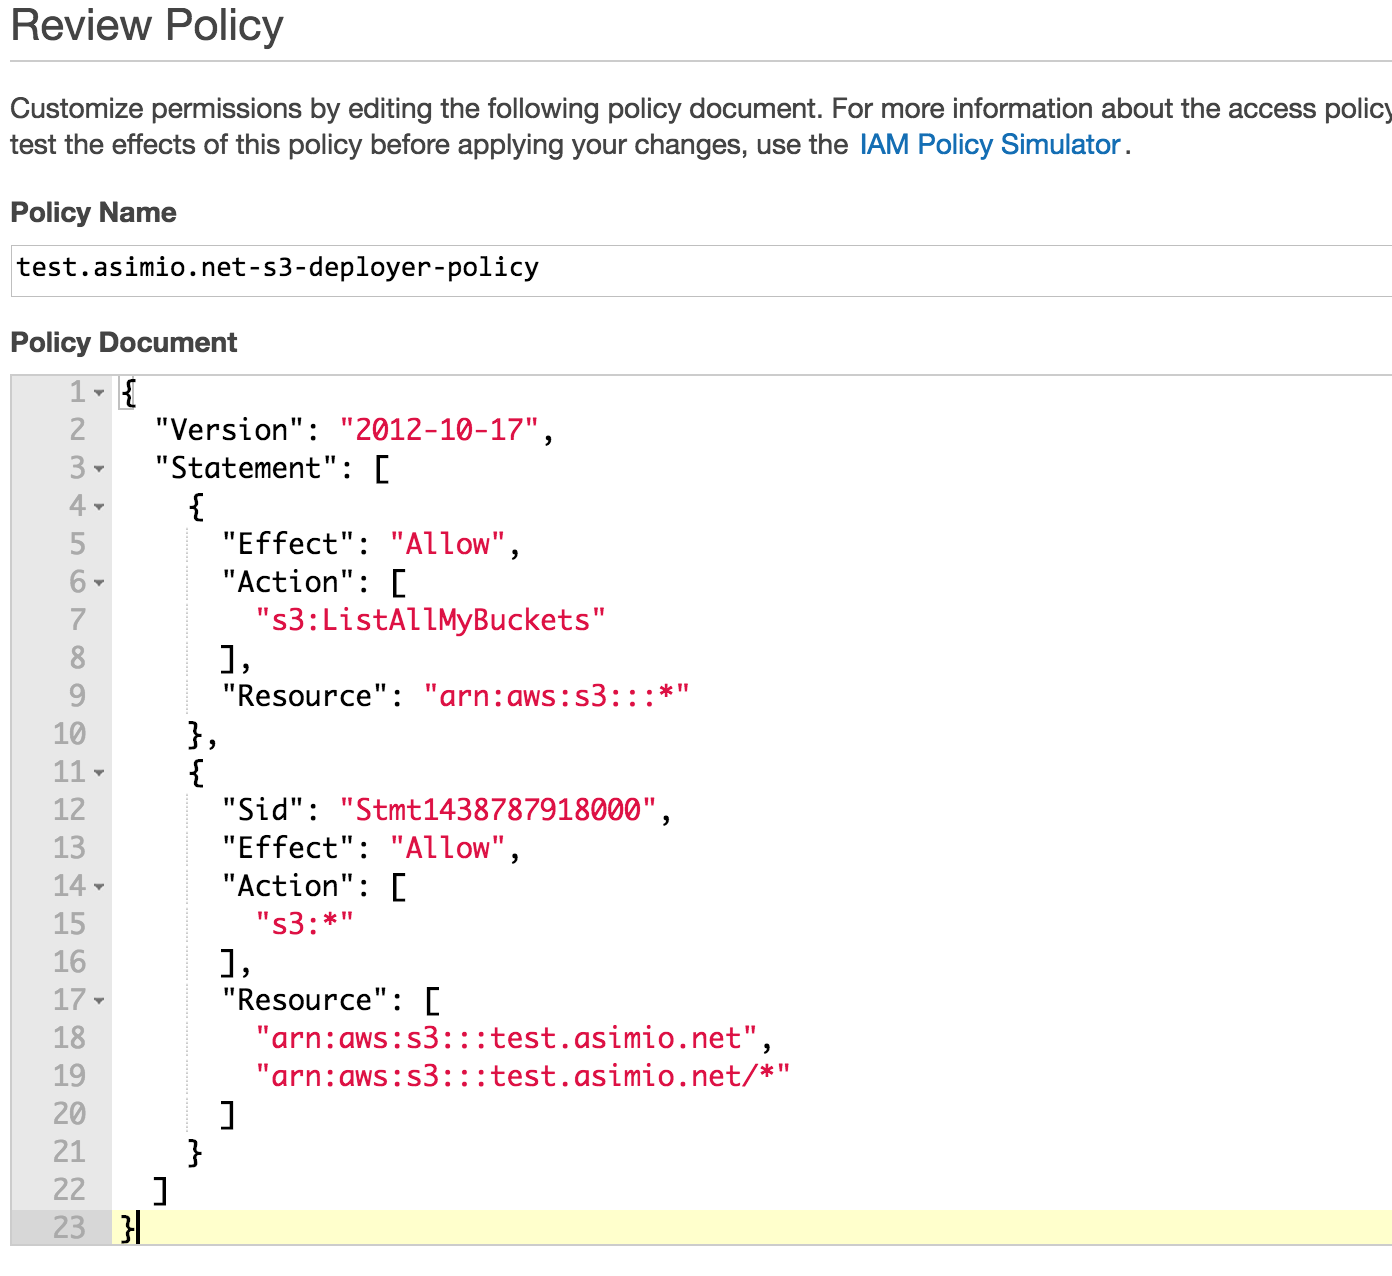
Update Policy Name and Policy Document as shown in the figure (JSON Policy could be found next to the figure). Click Apply Policy
-
 Review AWS IAM Policy
{
  "Version": "2012-10-17",
  "Statement": [
    {
      "Effect": "Allow",
      "Action": [
        "s3:ListAllMyBuckets"
      ],
      "Resource": "arn:aws:s3:::*"
    },
    {
      "Sid": "Stmt1438787918000",
      "Effect": "Allow",
      "Action": [
        "s3:*"
      ],
      "Resource": [
        "arn:aws:s3:::test.asimio.net",
        "arn:aws:s3:::test.asimio.net/*"
      ]
    }
  ]
}-
CREATE AWS IAM USER
-
Login to AWS IAM if you haven’t logged in yet.
-
Click on Users on the left-side menu
-
Click Create New Users
-
Enter test.asimio.net-s3-deployer-user, keep Generate an access key for each user checked and click Create
-
Click Download Credentials and keep this .csv file safe then click Close.
-
Click on the newly created User -> Attach User to Groups and select test.asimio.net-s3-deployer-group -> Add to Groups
-
At this point, test.asimio.net-s3-deployer-user will be able to deploy/publish a site hosted on AWS S3.
- CONFIGURE s3_website FOR my-new-site
cd ~/my-new-site
s3_website cfg create
This creates a file named s3_website.yml in the site’s root directory that would still need to be edited
with credentials from previously created AWS IAM User, which could be found in the downloaded .csv file.
Open it and update these settings:
s3_id: YOUR_AWS_S3_ACCESS_KEY_ID
s3_secret: YOUR_AWS_S3_SECRET_ACCESS_KEY
s3_bucket: test.asimio.net
Save it and run:
s3_website cfg applyI’m not using Cloudfront so:
I answered “N” to Do you want to deliver your website via CloudFront, the CDN of Amazon? question.
- DEPLOY my-new-site to AWS S3 BUCKET
After changes are made to the site, it can be published executing:
cd ~/my-new-site
jekyll build
s3_website push
Open it at test.asimio.net
6. STATIC BLOG’S CONTINUOUS DEPLOYMENT WITH JENKINS
I’ll go a step further, I’ll setup Jenkins to automatically deploy the site after a new post is added.
Requirements:
-
Site under SCM. I have a Stash instance running in my home lab that includes a few repos, this blog being one of them.
-
Jenkins instance. I also have a Jenkins master running in my home lab and a few Jenkins slaves to build artifacts, this is what I’ll use to build and deploy my blog.
-
The Jenkins slave was also setup according to instructions in SETUP JEKYLL section.
I would also like to prevent the site from building and deploying when there are meaningless changes, like checking changes into the site’s _drafts directory. The strategy I came up with was to create a Git branch for every new blog entry, work with this branch is done either in _drafts or _posts directories, once an entry is ready to be published, it makes it to the _posts directory of the branch and then merged it with master which should cause Jenkins to trigger build job.
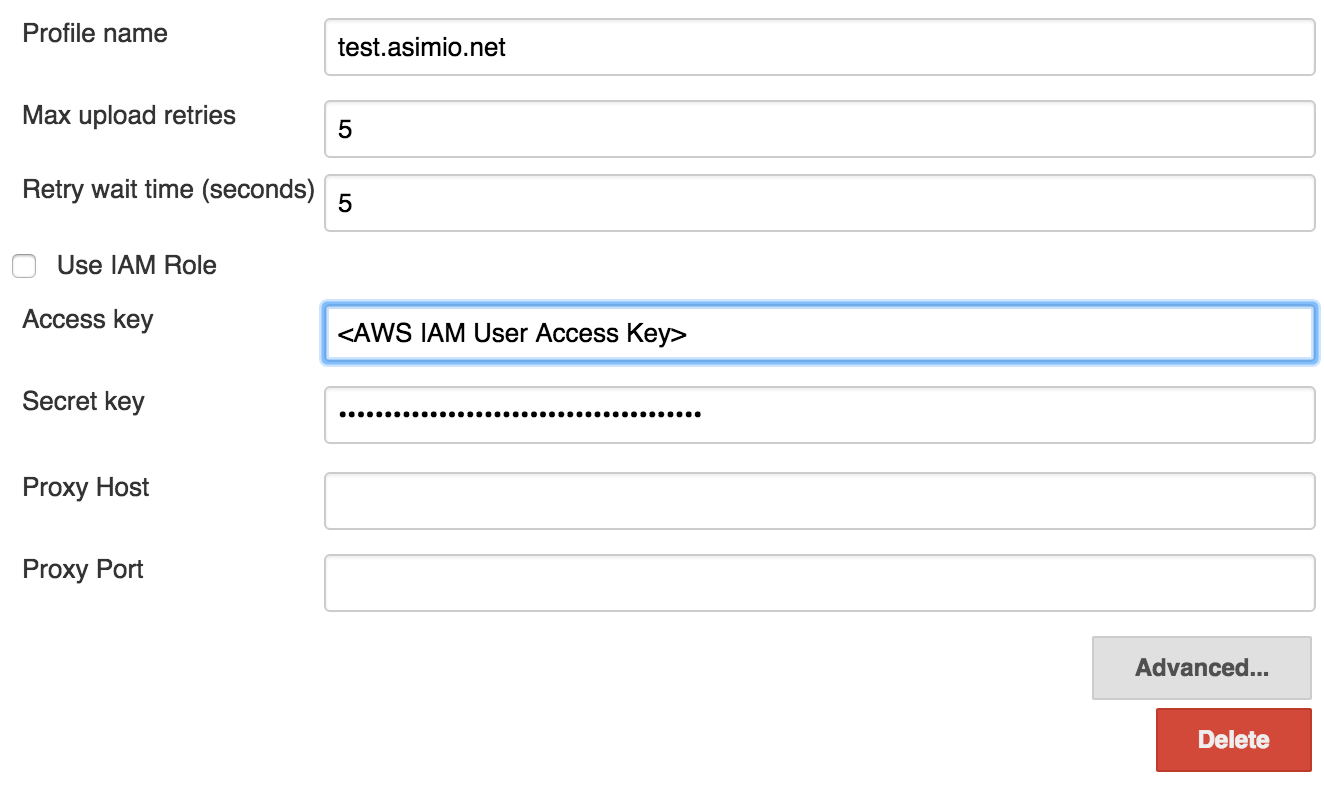
- S3 Jenkins Plugin Configuration. Once completed, s3_website-related steps as described in CONFIGURE s3_website section won’t be needed since this plugin would be doing that work. Jenkins -> Manage Jenkins -> Configure System -> Amazon S3 profiles -> Add
 Jenkins Amazon S3 plugin configuration
Update Access Key and Secret Key with same values used when configuring s3_website in CONFIGURE s3_website section.
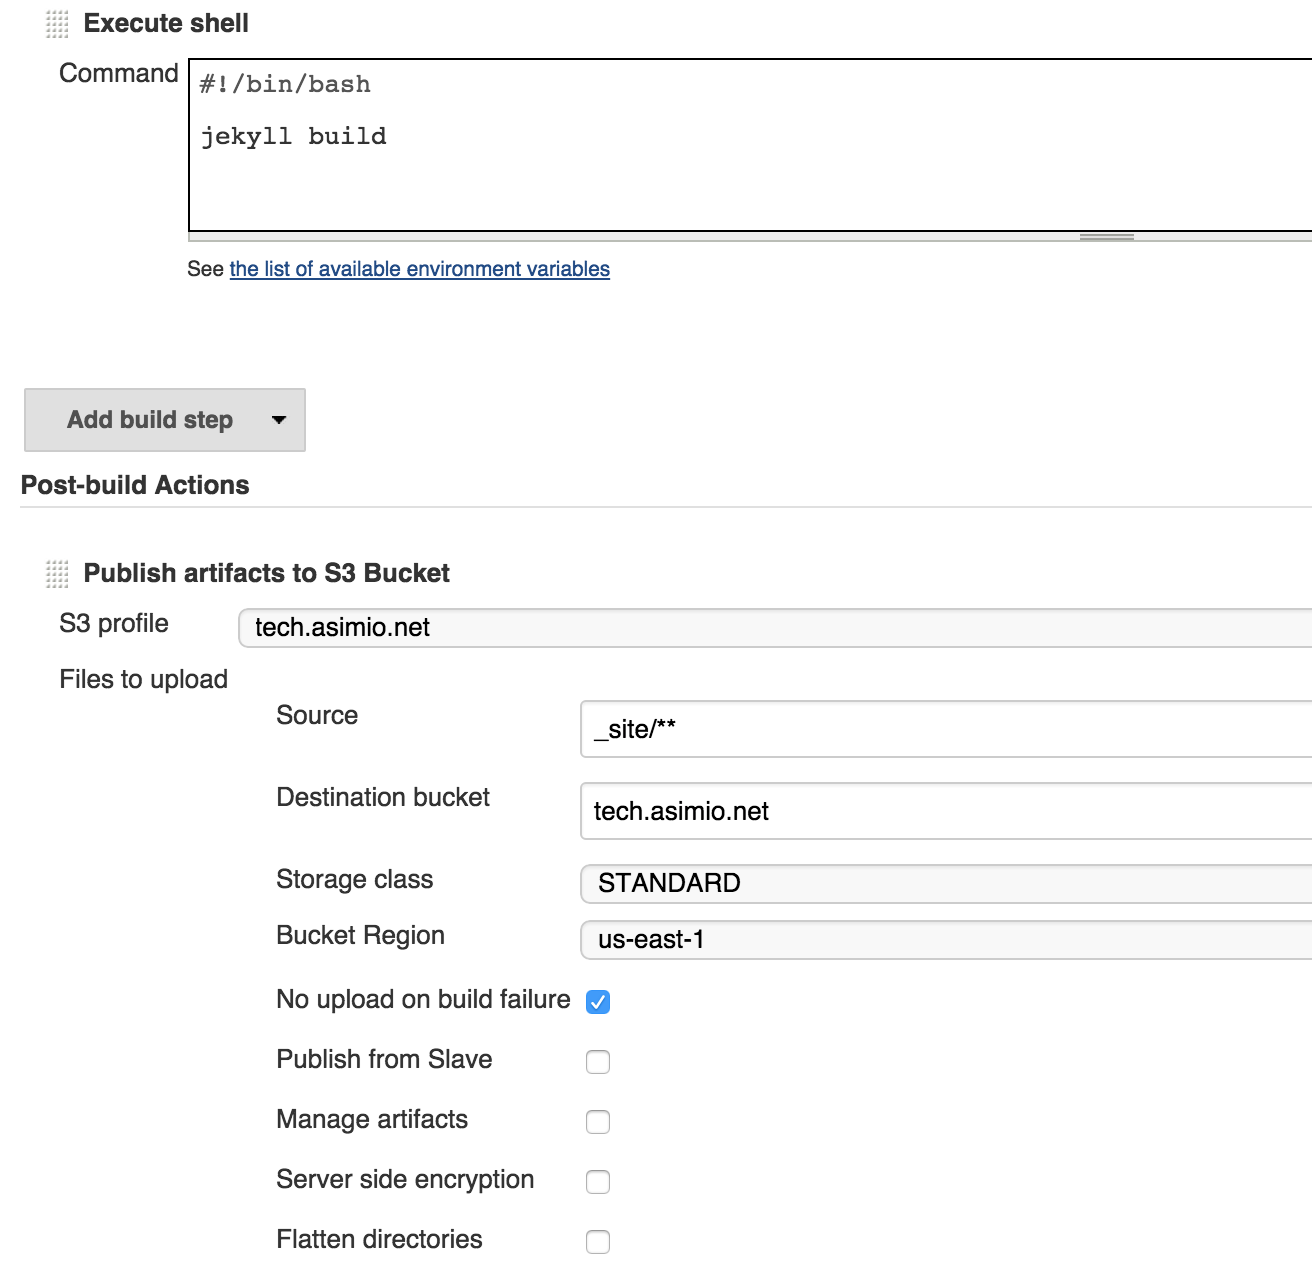
- Jenkins Job. Create Freestyle project named test.asimio.net. Since I’m building this artifact in a VM, I’m restricting it to build in a slave labeled jekyll so that other VMs without required packages don’t pick this job up -> Setup Git repo -> Build -> Execute shell with this content:
#!/bin/bash

jekyll build
Then add Post-build Actions -> Publish artifacts to S3 Bucket configured as shown below:
 Jenkins Publish artifacts to S3 bucket job configuration
- Seeing it in Action
commit notification 33001d8b844d42a007249ab14d8593fd0307afee
Building remotely on jk-slave-lin-x64-26 (trusty jekyll ubuntu linux amd64) in workspace /opt/jenkins/workspace/tech.asimio.net
 > git rev-parse --is-inside-work-tree # timeout=10
Fetching changes from the remote Git repository
 > git config remote.origin.url http://git.3velopers.net:7990/scm/ab/tech.asimio.net.git # timeout=10
Fetching upstream changes from http://git.3velopers.net:7990/scm/ab/tech.asimio.net.git
 > git --version # timeout=10
using .gitcredentials to set credentials
 > git config --local credential.username ootero # timeout=10
 > git config --local credential.helper store --file=/tmp/git6872699920751082856.credentials # timeout=10
 > git -c core.askpass=true fetch --tags --progress http://git.3velopers.net:7990/scm/ab/tech.asimio.net.git +refs/heads/*:refs/remotes/origin/*
 > git config --local --remove-section credential # timeout=10
 > git rev-parse 33001d8b844d42a007249ab14d8593fd0307afee^{commit} # timeout=10
 > git branch -a --contains 33001d8b844d42a007249ab14d8593fd0307afee # timeout=10
 > git rev-parse remotes/origin/master^{commit} # timeout=10
Checking out Revision 33001d8b844d42a007249ab14d8593fd0307afee (origin/master)
 > git config core.sparsecheckout # timeout=10
 > git checkout -f 33001d8b844d42a007249ab14d8593fd0307afee
 > git rev-list 826105d989b679dc601aabbf81e0ab30e0759428 # timeout=10
[tech.asimio.net] $ /bin/bash /tmp/hudson2014330040523107546.sh
Configuration file: /opt/jenkins/workspace/tech.asimio.net/_config.yml
            Source: /opt/jenkins/workspace/tech.asimio.net
       Destination: /opt/jenkins/workspace/tech.asimio.net/_site
      Generating...
                    done.
 Auto-regeneration: disabled. Use --watch to enable.
Publish artifacts to S3 Bucket Using S3 profile: tech.asimio.net
Publish artifacts to S3 Bucket bucket=tech.asimio.net, file=Asimio.net-Architecture.html region=us-east-1, upload from slave=false managed=false , server encryption false
Publish artifacts to S3 Bucket bucket=tech.asimio.net, file=A_static_blog_hosted_at_Amazon_S3_built_with_Jekyll_and_Jenkins.html region=us-east-1, upload from slave=false managed=false , server encryption false
Publish artifacts to S3 Bucket bucket=tech.asimio.net, file=CNAME region=us-east-1, upload from slave=false managed=false , server encryption false
Publish artifacts to S3 Bucket bucket=tech.asimio.net, file=LICENSE region=us-east-1, upload from slave=false managed=false , server encryption false
Publish artifacts to S3 Bucket bucket=tech.asimio.net, file=index.html region=us-east-1, upload from slave=false managed=false , server encryption false
Publish artifacts to S3 Bucket bucket=tech.asimio.net, file=index.html region=us-east-1, upload from slave=false managed=false , server encryption false
Publish artifacts to S3 Bucket bucket=tech.asimio.net, file=main.css region=us-east-1, upload from slave=false managed=false , server encryption false
Publish artifacts to S3 Bucket bucket=tech.asimio.net, file=index.html region=us-east-1, upload from slave=false managed=false , server encryption false
Publish artifacts to S3 Bucket bucket=tech.asimio.net, file=feed.xml region=us-east-1, upload from slave=false managed=false , server encryption false
Publish artifacts to S3 Bucket bucket=tech.asimio.net, file=asimio.net-architecture.png region=us-east-1, upload from slave=false managed=false , server encryption false
Publish artifacts to S3 Bucket bucket=tech.asimio.net, file=aws-s3-bucket-inline-custom-policy.png region=us-east-1, upload from slave=false managed=false , server encryption false
Publish artifacts to S3 Bucket bucket=tech.asimio.net, file=aws-s3-bucket-name-and-region.png region=us-east-1, upload from slave=false managed=false , server encryption false
Publish artifacts to S3 Bucket bucket=tech.asimio.net, file=aws-s3-bucket-review-policy.png region=us-east-1, upload from slave=false managed=false , server encryption false
Publish artifacts to S3 Bucket bucket=tech.asimio.net, file=aws-s3-bucket-static-website-hosting.png region=us-east-1, upload from slave=false managed=false , server encryption false
Publish artifacts to S3 Bucket bucket=tech.asimio.net, file=development-tool-chain-min.jpg region=us-east-1, upload from slave=false managed=false , server encryption false
Publish artifacts to S3 Bucket bucket=tech.asimio.net, file=favicon.ico region=us-east-1, upload from slave=false managed=false , server encryption false
Publish artifacts to S3 Bucket bucket=tech.asimio.net, file=home-lab-min.jpg region=us-east-1, upload from slave=false managed=false , server encryption false
Publish artifacts to S3 Bucket bucket=tech.asimio.net, file=jenkins-jekyll-job-config.png region=us-east-1, upload from slave=false managed=false , server encryption false
Publish artifacts to S3 Bucket bucket=tech.asimio.net, file=jenkins-s3-plugin-config.png region=us-east-1, upload from slave=false managed=false , server encryption false
Publish artifacts to S3 Bucket bucket=tech.asimio.net, file=topbutton.png region=us-east-1, upload from slave=false managed=false , server encryption false
Publish artifacts to S3 Bucket bucket=tech.asimio.net, file=index.html region=us-east-1, upload from slave=false managed=false , server encryption false
Publish artifacts to S3 Bucket bucket=tech.asimio.net, file=jquery-1.9.1.min.js region=us-east-1, upload from slave=false managed=false , server encryption false
Publish artifacts to S3 Bucket bucket=tech.asimio.net, file=totop.js region=us-east-1, upload from slave=false managed=false , server encryption false
Publish artifacts to S3 Bucket bucket=tech.asimio.net, file=sitemap.xml region=us-east-1, upload from slave=false managed=false , server encryption false
Publish artifacts to S3 Bucket bucket=tech.asimio.net, file=index.html region=us-east-1, upload from slave=false managed=false , server encryption false
Started calculate disk usage of build
Finished Calculation of disk usage of build in 0 seconds
Started calculate disk usage of workspace
Finished Calculation of disk usage of workspace in 0 seconds
Finished: SUCCESS
7. YET ANOTHER IMPROVEMENT
I recently landed on this blog entry and noticed there could be another improvement to the process I’m using to deploy my blog, include html-proofer gem to find broken links. I haven’t used it yet, but you might find it useful.
Thanks for reading and as always, feedback is very much appreciated. If you found this post helpful and would like to receive updates when content like this gets published, sign up to the newsletter.
NEED HELP?
I provide Consulting Services.ABOUT THE AUTHOR


