Search results
Pushing Spring Boot 2 Docker images to Amazon ECR
1. OVERVIEW
Now that you are able to build Docker images without needing a Docker daemon using Jib, your organization most-likely would like to keep those images from being pulled down publicly. In this case it makes sense to store them in a private Docker registry.
Amazon Elastic Container Registry (ECR) is a cheap option to store both, public and private Docker images. It even makes more sense to use AWS ECR if your organization is already invested in other AWS services such as IAM and ECS.
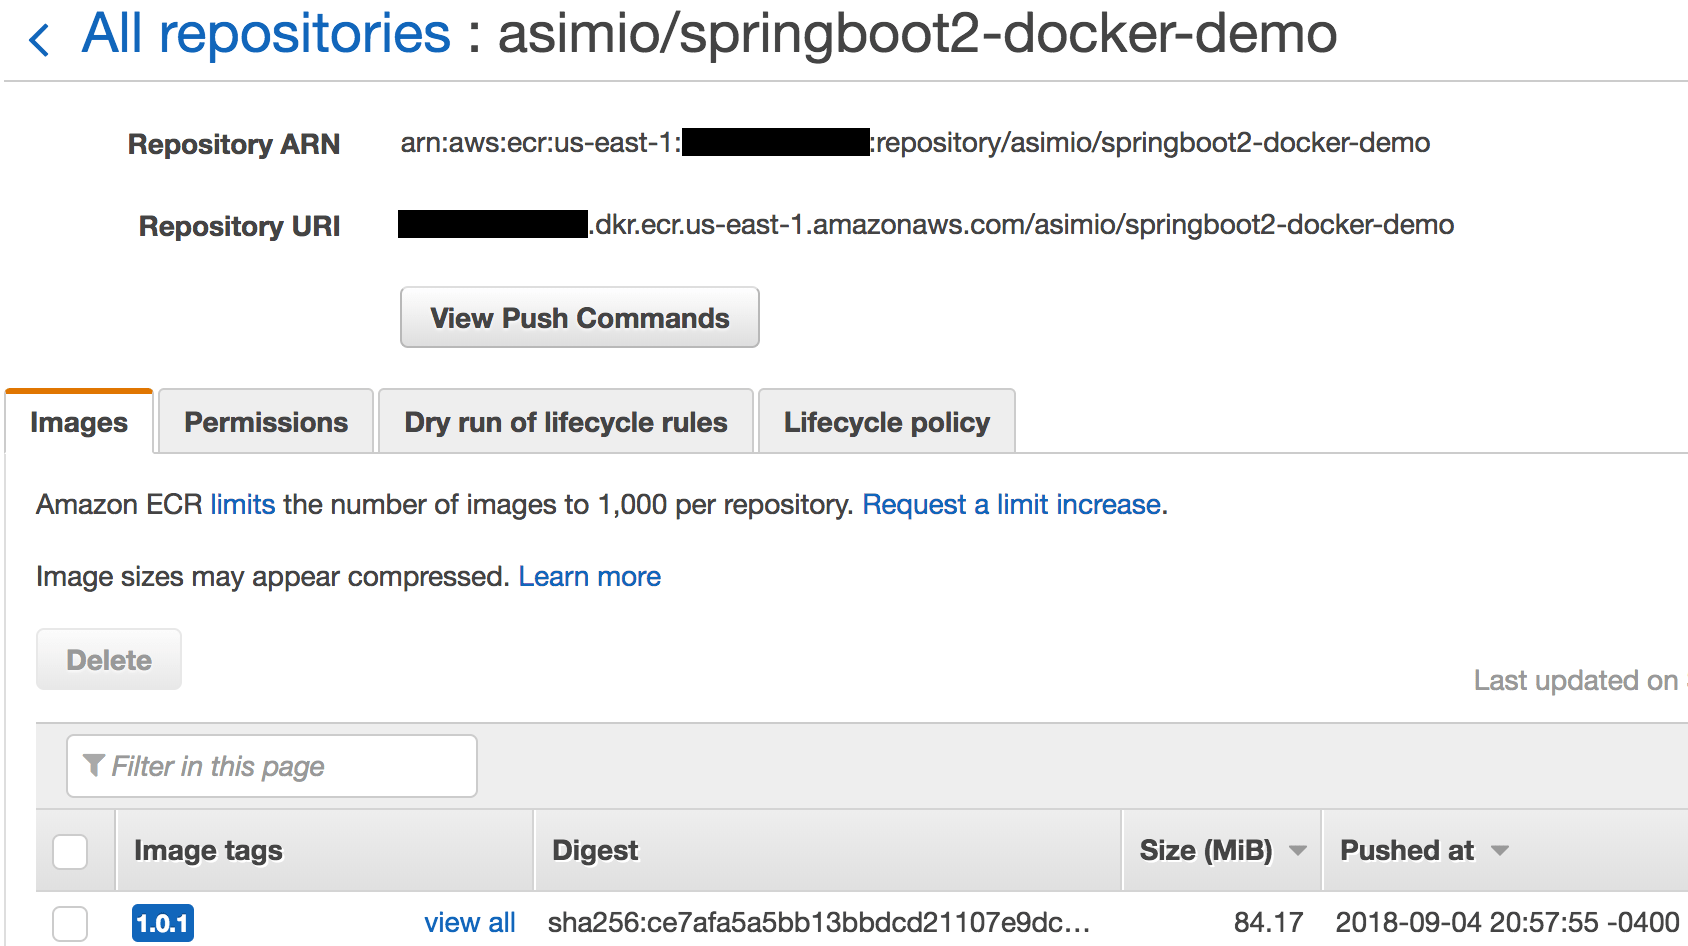
This tutorial covers installing the required software, setting up the AWS infrastructure and configuring settings to push a Docker image to a private Amazon ECR repository.
2. REQUIREMENTS
- Java 7+.
- Maven 3.2+.
- Python 2.6.5+ or Python 3.3+.
- aws-cli 1.x.y with support for AWS ECR operations.
- amazon-ecr-credential-helper.
- go language, required by amazon-ecr-credential-helper.
3. INSTALLING MISSING DEPENDENCIES
I’m not going to cover installing Java, Maven and Python. A couple of Google searches will point to resources to do so.
mvn --version
Apache Maven 3.3.3 (7994120775791599e205a5524ec3e0dfe41d4a06; 2015-04-22T07:57:37-04:00)
Maven home: /Users/ootero/Software/apache-maven-3.3.3
Java version: 1.8.0_171, vendor: Oracle Corporation
Java home: /Library/Java/JavaVirtualMachines/jdk1.8.0_171.jdk/Contents/Home/jre
Default locale: en_US, platform encoding: UTF-8
OS name: "mac os x", version: "10.13.6", arch: "x86_64", family: "mac"

python --version
Python 2.7.10
3.1. AWS-CLI
You might have to install or upgrade aws-cli to a newer version for you to be able to run aws-cli ECR operations:
curl "https://s3.amazonaws.com/aws-cli/awscli-bundle.zip" -o "awscli-bundle.zip"
...
unzip awscli-bundle.zip
...
./awscli-bundle/install
...
You can now run: /Users/otero005/.local/lib/aws/bin/aws --version
aws --version
aws-cli/1.15.78 Python/2.7.10 Darwin/16.7.0 botocore/1.10.773.2. GO
Follow instructions at https://golang.org/doc/install to install go.
go version
go version go1.10.3 darwin/amd64
3.3. AMAZON-ECR-CREDENTIAL-HELPER
This docker-credential-helper requires go-lang, previously installed:
go get -u github.com/awslabs/amazon-ecr-credential-helper/ecr-login/cli/docker-credential-ecr-login
...
Then move the go to a folder already in the execution PATH:
mv ~/go/bin/docker-credential-ecr-login ~/bin/
docker-credential-ecr-login version
0.6.0
4. SETUP THE AWS INFRASTRUCTURE
I have being practicing creating dedicated AWS IAM users with privileges and roles for specific tasks, such us Setup a Maven repository using an AWS S3 bucket to store your Java artifacts, Deploying a static Jekyll site to Amazon S3 and so on.
Let’s create an IAM user with privileges to pull and push Docker images from a private ECR repository:
4.1. CREATE AWS IAM POLICY
- Open AWS IAM policies web page
- Click Create policy button
- Click JSON tab and enter this policy code:
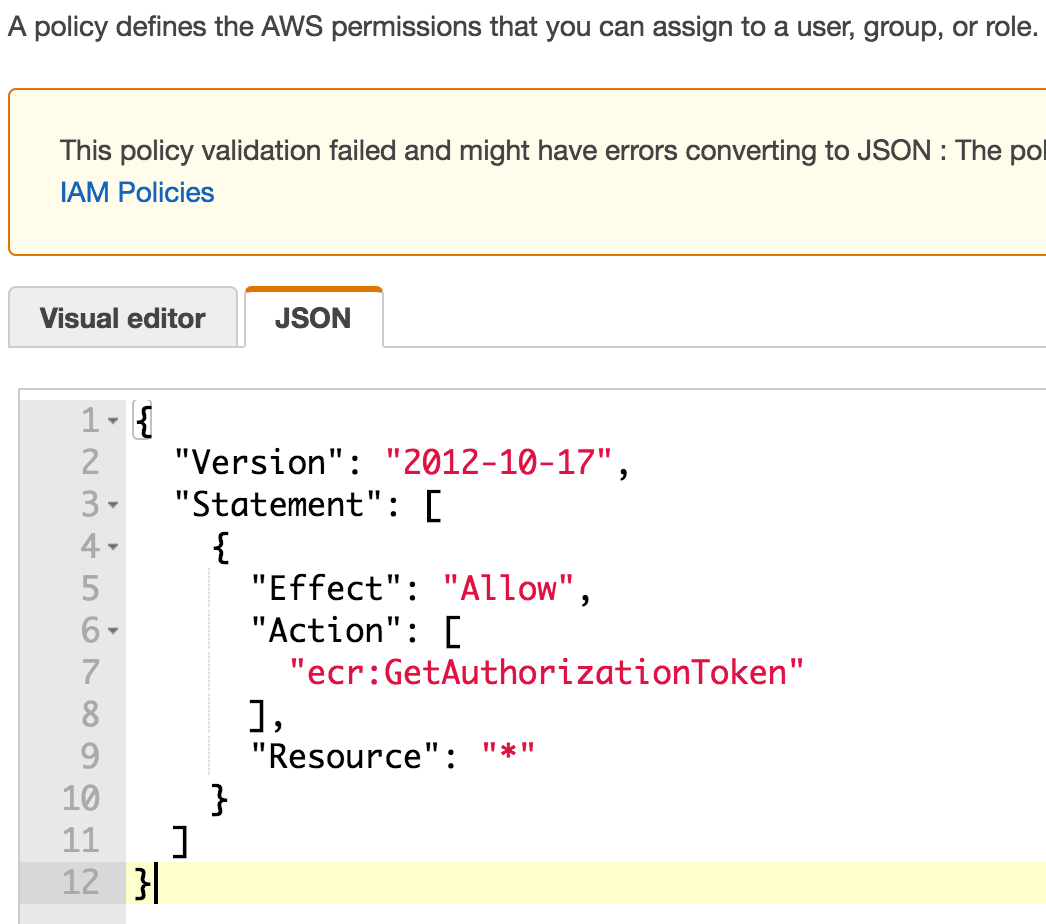 Create an AWS IAM Policy for ECR - JSON code
{
  "Version": "2012-10-17",
  "Statement": [
    {
      "Effect": "Allow",
      "Action": [
        "ecr:GetAuthorizationToken"
      ],
      "Resource": "*"
    }
  ]
}- Click Review policy button
- Name it ecr-authOnly-policy and click Create policy button
4.2. CREATE AWS IAM USER
- Click Users -> Add user button
- Name it ecr-rw-user and check Programmatic access checkbox as the Access type
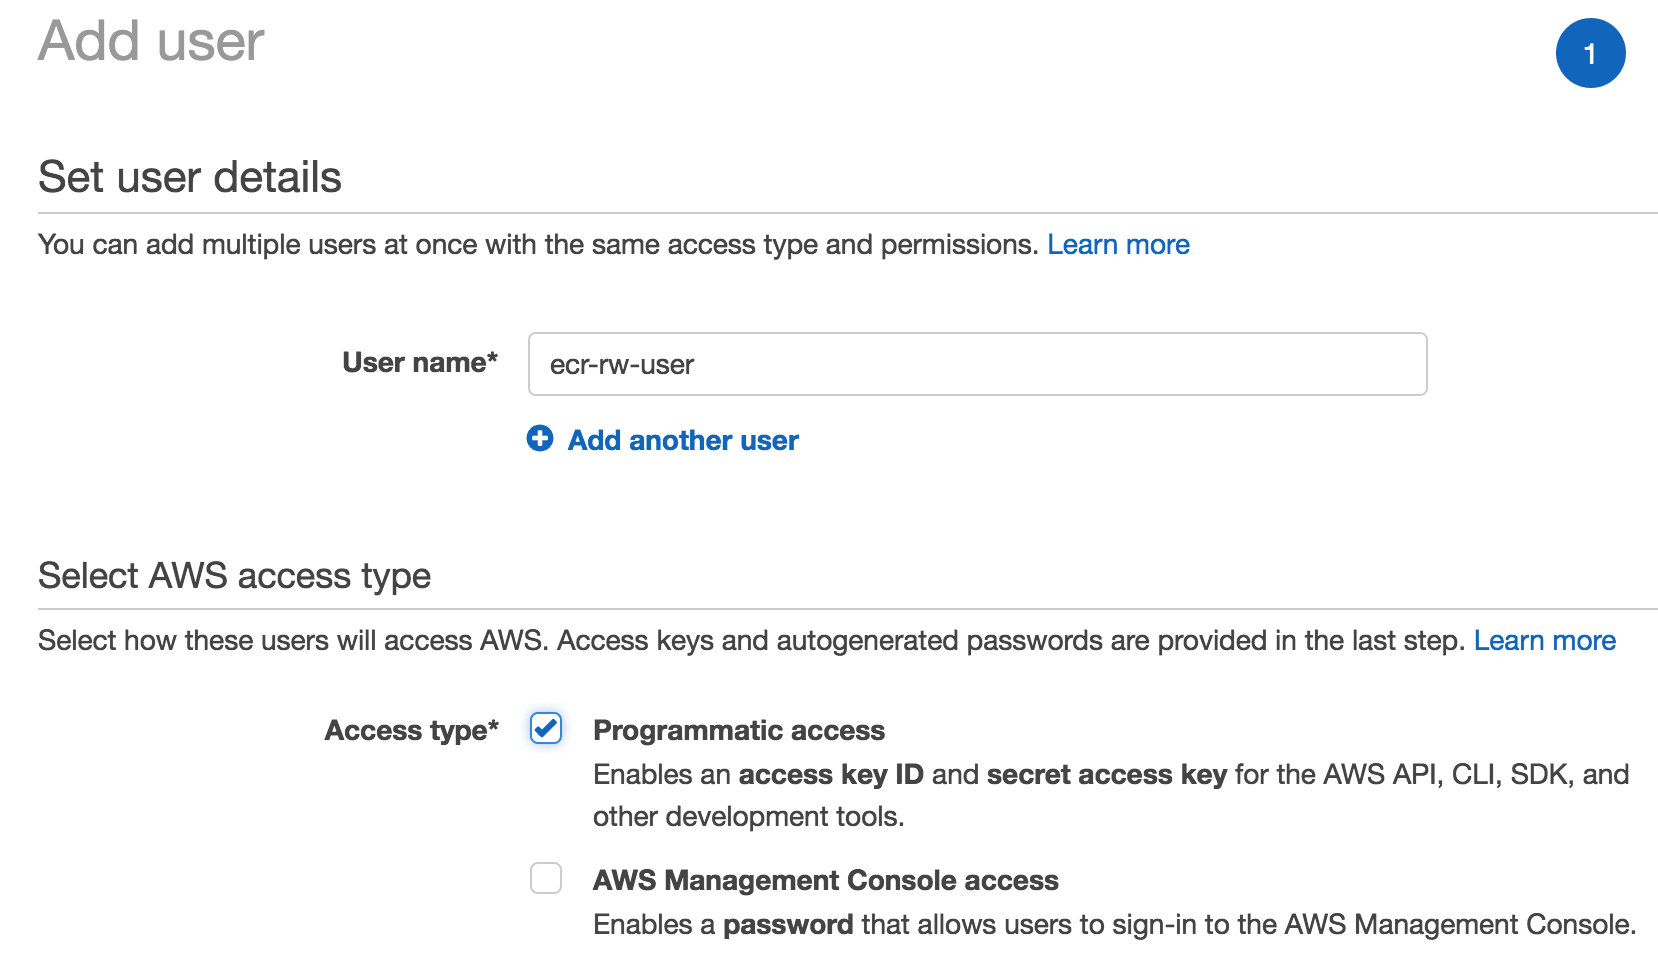 Create an AWS IAM User for ECR
- Click Next: Permissions button
- Click Attach existing policies directly tab
- Search and select previously created policy ecr-authOnly-policy
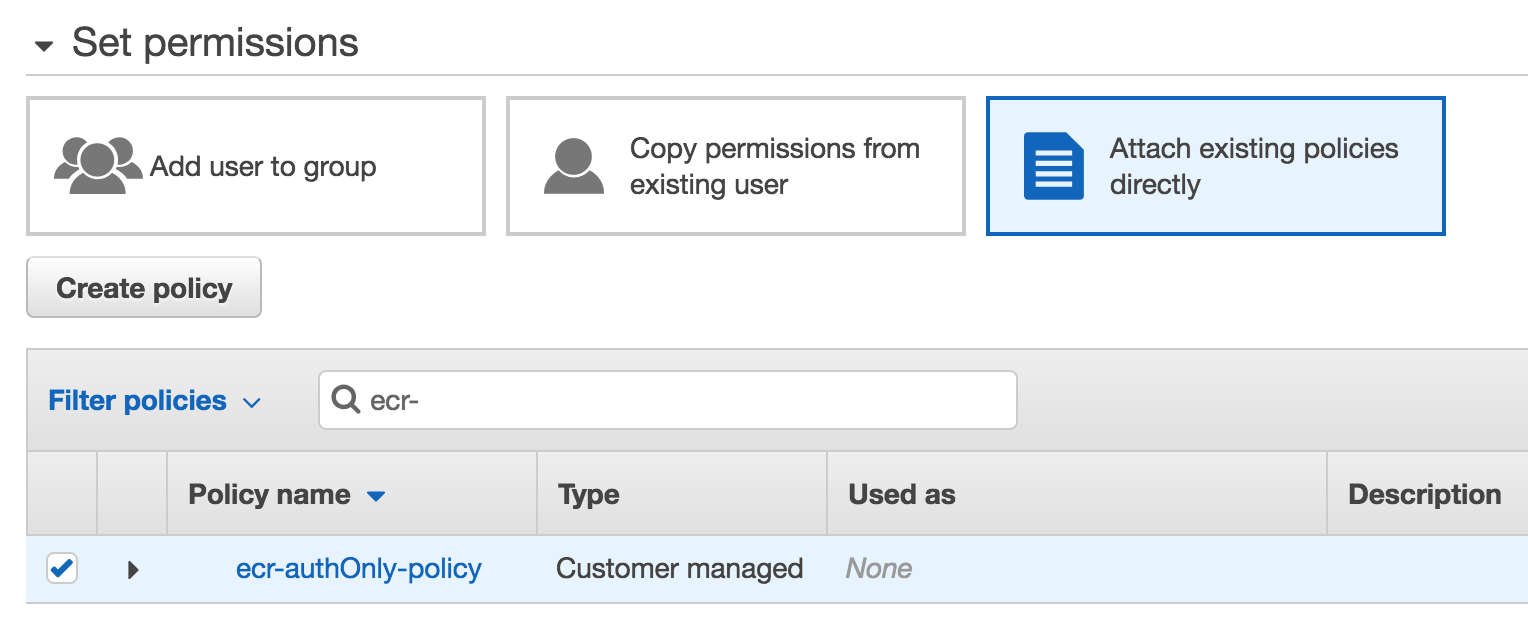 Create an AWS IAM User for ECR - Permissions
- Click Next: Review and Create user buttons
- Take note of the user’s Access key ID and Secret access key, you will need it here
Now that you have a dedicated IAM user with the least required privileges to pull / push Docker images from / to an ECR repository, let’s create the repository then:
4.3. CREATE AWS ECR REPOSITORY
- Open AWS ECS web page
- Click Create repository button
- Name it asimio/springboot2-docker-demo and keep note of the autogenerated Repository URI, you will need it here and here
 Create an AWS ECR repository - Configuration
- Click Next step and Done buttons
Besides ecr-rw-user IAM entity having ecr:GetAuthorizationToken permission in its attached policy, ECR repositories also need a resource-based control access policy.
- Click Permissions tab
- Click Add button
- Search for ecr-rw-user in All IAM entities list and » Add it to the Selected IAM entities list
- Check Push/Pull actions in the Actions section. It should check some other permissions
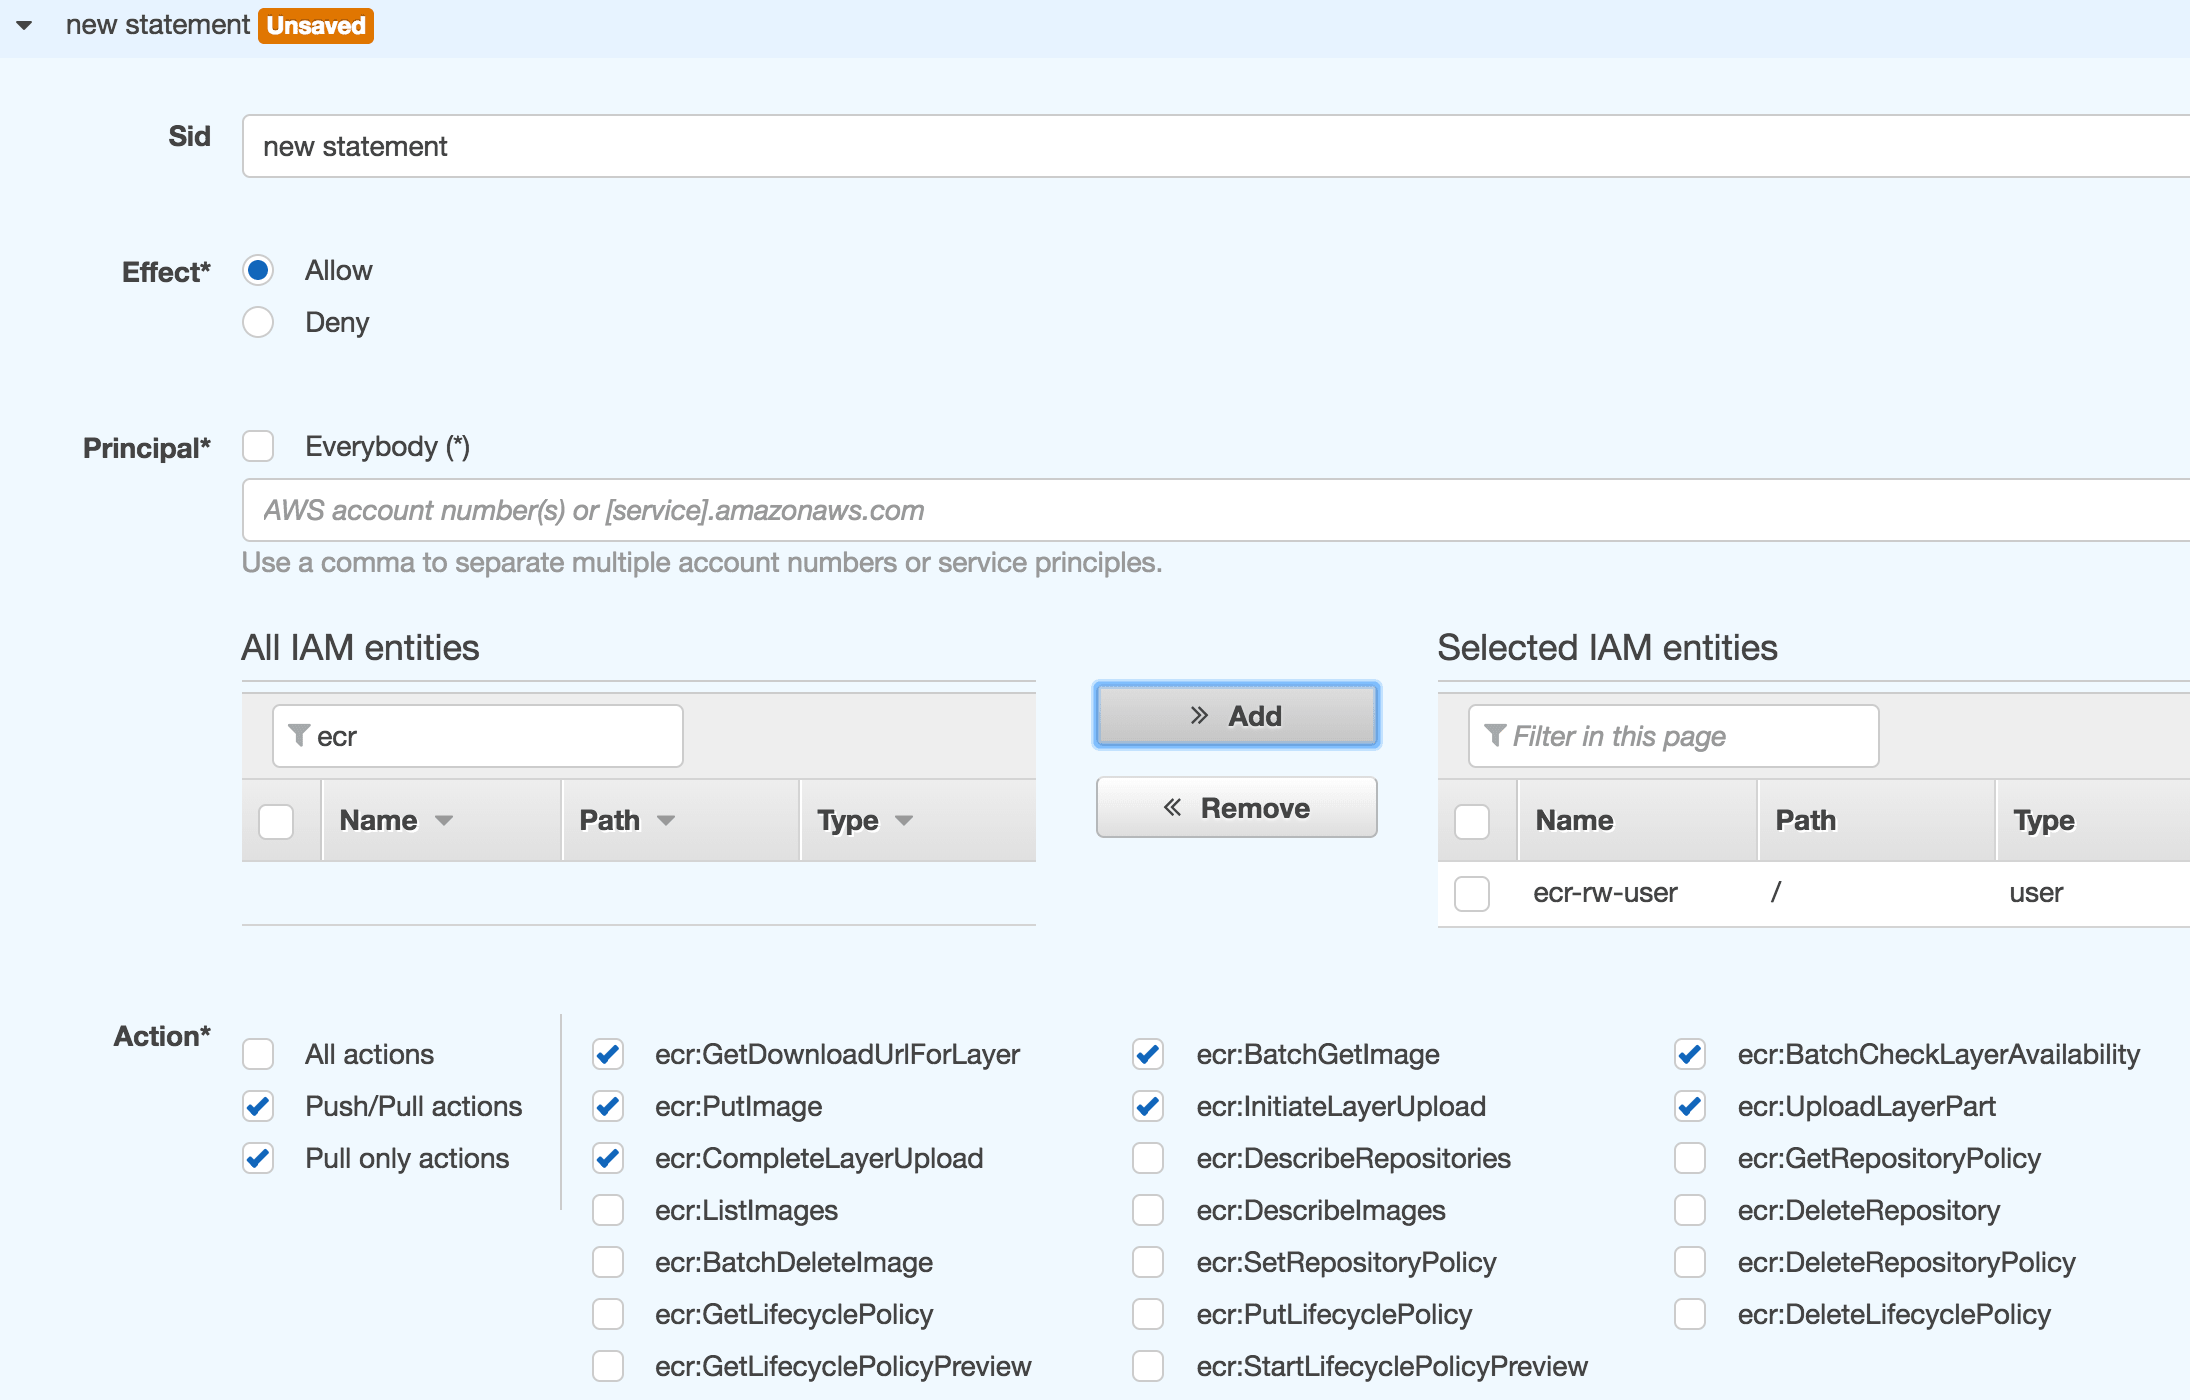 Create an AWS ECR repository - Permissions
- Click Save all button
This is all you need to setup the AWS infrastructure to push private Docker images. Lets now configure the development or build environment.
5. UPDATE GOOGLE JIB CONFIGURATION
See Containerize Spring Boot applications with spring-boot-maven-plugin and publish them to GHCR for packaging Spring Boot applications into Docker images.
Let’s update the existing jib-maven-plugin configuration in pom.xml:
...
<build>
  <plugins>
...
    <plugin>
      <groupId>com.google.cloud.tools</groupId>
      <artifactId>jib-maven-plugin</artifactId>
      <version>0.9.7</version>
      <configuration>
...
        <to>
-          <image>asimio/${project.artifactId}:${project.version}</image>
+          <image>xxxxxxxxxxxx.dkr.ecr.us-east-1.amazonaws.com/asimio/${project.artifactId}:${project.version</image>
+          <credHelper>ecr-login</credHelper>
        </to>
...
      </configuration>
  </plugin>
...Instead of pushing resulting image to a public Docker hub repository, I’m going to push it to a private Elastic Container Registry repository. But first lets update some configuration settings.
6. LOCAL DOCKER, AWS PERMISSIONS CONFIGURATION
Let’s add a couple of configurations to be able to login to the Amazon ECR repository with specific AWS IAM entity credentials:
cat ~/.docker/config.json
{
  "credHelpers": {
    "xxxxxxxxxxxx.dkr.ecr.us-east-1.amazonaws.com": "ecr-login"
  }
}credHelpers specifies credential helpers to use over credsStore or auths to store and retrieve credentials for specific registries. If set, the binary docker-credential-<value> will be used for such purposes. In this case docker-credential-ecr-login installed here.
cat ~/.aws/config
[default]
region = us-east-1
Setting the region in ~/.aws/config allows you to run commands omitting it.
cat ~/.aws/credentials
...
[ecr-push-user]
aws_access_key_id = yyyyyyyyyy
aws_secret_access_key = zzzzzzzzzz7. BUILDING AND PUSHING THE DOCKER IMAGE
Let’s first build the Java artifact:
mvn clean versions:set -DnewVersion=1.0.1
...
mvn package
...
[INFO] ------------------------------------------------------------------------
[INFO] BUILD SUCCESS
[INFO] ------------------------------------------------------------------------
...
And now let’s build and push the Docker image:
AWS_PROFILE=ecr-push-user mvn --debug jib:build
...
[DEBUG] Building and pushing image : 4219.54 ms
[INFO]
[INFO] Container entrypoint set to [java, -Xms512m, -Xmx512m, -cp, /app/libs/*:/app/resources/:/app/classes/, com.asimio.api.ApiDockerDemoApplication]
[INFO]
[INFO] Built and pushed image as xxxxxxxxxxxx.dkr.ecr.us.amazonaws.com/asimio/springboot2-docker-demo:1.0.1
[INFO]
[INFO] ------------------------------------------------------------------------
[INFO] BUILD SUCCESS
[INFO] ------------------------------------------------------------------------
...
Jib uses AWS_PROFILE enviroment variable to select an AWS profile from ~/.aws/credentials. ecr-push-user in this case, created when setting up AWS permissions.
 Pushing a Docker image to an AWS ECR repository
Logs and image show a Docker image created using Jib and pushed to a private ECR repository.
The steps outlined in this tutorial don’t need a Docker daemon since aws ecr get-login is not used.
Hosting your Docker images in Amazon Elastic Container Registry repositories is a very good option if your organization is using or planning to use other AWS services.
Thanks for reading and as always, feedback is very much appreciated. If you found this post helpful and would like to receive updates when content like this gets published, sign up to the newsletter.
8. SOURCE CODE
Accompanying source code for this blog post can be found at:
9. REFERENCES
- https://docs.aws.amazon.com/cli/latest/userguide/installing.html
- https://docs.aws.amazon.com/cli/latest/userguide/cli-install-macos.html
- https://docs.aws.amazon.com/AmazonECR/latest/userguide/ecr_managed_policies.html
- https://golang.org/doc/install
- https://github.com/awslabs/amazon-ecr-credential-helper
- https://docs.docker.com/engine/reference/commandline/cli/
NEED HELP?
I provide Consulting Services.ABOUT THE AUTHOR


